Tuesday, August 28, 2012

How To Turn Pants Into A Skirt

I had some capris that I never wore anymore and I also needed a new jean skirt, so I tried my hand at turning them into a skirt! I loved it so much, I went the next day and got my girls 2 pair of pants at our local Consignment shop and made them one each too! Love them!!! It doesn't hurt that they are super easy either! Yay!


You will Need:
* Pants/ Capris
* Seam Ripper
* Material for the center if you don't plan on using your cut off leg pieces for the center.

Here are my Capris that I never wore, Before.


Cut your capris or pants off 1" longer than you want the finished product to be.

Take your trusty Seam Ripper and seam rip the inner portion and up the front and back crotch area just enough to get your centers to lay flat.

If you don't have a Seam Ripper, GET ONE! They are awesome and doing this without one would be a huge headache!!!


Line up the crotch area of your pants, making it lay flat. Do this to both the front and back area.


Pin your front and back area how you want it to look. Remember the middle will be filled in later.


Take a piece of paper (you may even need to tape a few together to get it big enough), place it under the part of your skirt that needs filled in and trace.


After you trace both the front and back on paper, draw a line 1/2" out from your original outline. Cut your pattern on this line.


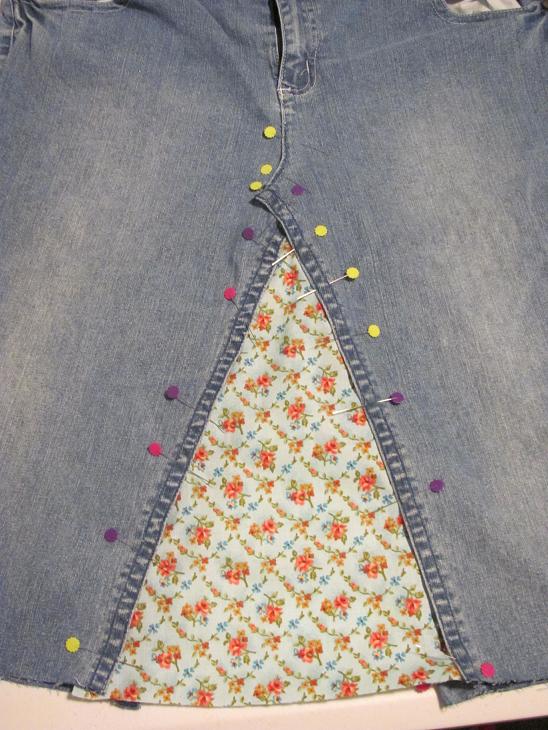
Cut your fabric pieces out using your template you made and pin them in place.

You may also use the left over scraps from the pants you cut off.


Sew around your new center AND remember to also sew down the front and back crotch areas that are now laying flat.

You can cut off any extra jean left over from the crotch area that would be bothersome.

You can serge or zigzag your piece you added now if you would like.


Fold over your bottom seam 1/2" and them another 1/2" and sew down. If you aren't comfortable with sewing through such thick material and it being folded a few times, then you can also serge or zigzag your edge, fold over 1" and sew the hem.

That's it! It's really not as hard as it may look! It takes practically no time at all once you get the first pair done and get into the grove!

Happy Sewing!


Saturday, August 25, 2012

Project Turning Pants into a Skirt

I was searching through my closet the other day and noticed some capris that I never wear anymore. I loved them when I bought them but when I washed them a few times, I could never get the bottom to stay like it should. It drove me nuts so they went to the back of the closet.

I was in need of a new skirt and these weren't working for me, so I decided my hand at turning my drab capris into a nice skirt!

I just finished it up and I have to say, I liked it so much that I went to our local consignment shop and got my girls some jeans to cut up and I made them each a new jean skirt too! They love it too!

It is so easy and it doesn't take as long as you would think! Ummm.... easy, fairly quick, and looks super cute... yeah, count me in!!!

I will be sharing the how to soon! It's late and tomorrow is church and family day, so it shall be up Monday! Be on the look-out!

Happy Crafting!

Tuesday, August 21, 2012

Applique Ballet Ribbon Shirt

I saw a shirt a while back in a store that was appliqued ballet shoes and actual ribbon. I thought it was so cute but.... I have 3 girls and I knew I could make all 3 for the price of one. Grant it, my "ballet shoe" is no where near perfect but I think it turned out nicely.


You will Need:
* Ribbon
* 2 Contrasting Fabrics
* Heat n Bond Lite Sewable
* Make your own shoe template or Download My FREE Template Here

Cut your ribbon as long as you would like your "laces" to be. Twist it loosely and pin it in place, overlapping the two top ends.

Iron on your sewable Heat n Bond Lite to the back of your two fabrics (leave on paper backing) and cut two of each of the template.


Peal off the paper backing on your pieces and iron them down like shown in the picture. Sew around each piece like shown.


Now, sew your ribbon how you have it pinned down. Make a bow, heat seal the ends with a lighter and sew it on top where the two ribbons meet.

That's it! You're all done! Easy Peasy, right?! Now if you happen to have an embroidery machine, you could do the applique on the embroidery machine and get the same affect. Just remember to place the ribbons underneath your fabric.

Happy Crafting!


Monday, August 20, 2012

Dress Form Pin Cushion/ Necklace holder

I saw this great little Dress Form Mannequin pin cushion that Kris and Kim from The DIY Dish made and I fell in love instantly!!! Aren't they just adorable!? I loved them so much that I made a friend one too AND I'm giving one away for FREE in our next GIVEAWAY! These would also make super cute necklace holders!


Giveaways

***GIVEAWAYS***

I will be doing giveaways to one of my blog followers randomly. I will post in this Giveaway section of my blog our latest giveaway and the winner. Be sure to sign up and follow mamatothreechicks to be able to win. Who doesn't like to win stuff?!!!

mamatothreechicks.blogspot.com
Like Us On Facebook

Good luck and happy crafting!

8/27/12
GIVEAWAY: Dress Form Mannequin Pin Cushion
WINNER: Rebecca

Friday, August 10, 2012

Reversible Sewing Machine Cover


I decided to make myself a cute sewing machine cover and make it reversible too! I think all of us sewing addicts out there know that you either cover your machine or all that dust can cause problems.

First things first... measure your machine's length, height and width. When measuring the length, remember to include the turn wheel on the side.

Mine measured length 16", height 12", and width 7". I added 1" for seam allowance since I will be using a 1/2" seam allowance for each side.

Here's a little help just in case yours is the same measurements as mine.

So, my final measurements are 17"L x 13"H x 8"W. Get it?

* I cut (2) 13" x 17" (my front and back pieces)
* I cut (2) 13" x 8" (my sides pieces)
* I cut (1) 17" x 8" ( my top piece)


Iron some iron-on interfacing to all of your 5 outside pieces only. This will make it stiff enough to stand on it's own.


Lay your top piece on your back or front piece (it doesn't matter which) right sides together and sew a 1/2" seam allowance across.


Flip your top piece up and lay your other piece (front or back) right sides together and sew 1/2" seam.


All three pieces should now be connected together.

If you want to add any decoration or sew any ribbon(s) to the front or back, do that now.


Take your sides pieces and lay them right sides together on the front side of your cover and sew 1/2".


When you fold the sides out, this is what it should look like.


Take the back piece (that doesn't have the sides sewn to it yet) and bring it up pinning it to the side piece on each side and sew 1/2".


Now you will have a hole where the top and sides meet. Lets close that up!

Fold each side lining you top and sides pieces up like shown in the picture above.


Turn right side out and you should now have this box shape.

It's coming along! Yay!


Follow the same steps to make your lining except this time when sewing the sides, leave about a 3" opening.


With your main fabric turned right side out and your lining fabric turned wrong side out, place your main fabric inside your lining fabric. Pin and Sew 1/2" seam around the top.


Reach inside the 3" opening you left and pull everything right side out.

Whip stitch or machine stitch your opening closed.


Straighten and iron your fabric nice and neat and sew a stitch around the bottom, close to the edge.

Shewww.... ok, you're all done! Now see how wonderful your new sewing machine cover looks! I bet you did a great job!


How to make a Change Purse


I desperately needed a new little purse to put my sewing feet in. The one that came with my machine was plastic and ripped. So, I made this little change purse/ goodie purse to use for my sewing feet!

When doing a zipper on something like a change purse, I like to get my zipper a little bigger than I want my project to be. Ex. I wanted a 5"x5" change purse, so I got a 7" zipper. You can do it as big or small as you would like though. This was just the measurement I wanted.

You will need;
* Zipper
* Main fabric
* Lining fabric

If you want a stiffer purse, use some iron on interfacing on the backside of the main fabric.


First, cut your main fabric and lining fabric to the size you want but remember to add for seam allowance. I wanted a 5"x5", so I cut mine to a 6"x6".

Iron down the top edge of each one about 1/2".

Lay your lining pieces down, then place the zipper over them. Place your main fabric over the outside part of your zipper. (Your fabrics will be wrong sides together).

Make sure the bottom and top fabric are lined up and sew them into place at the zipper.


Now, open your zipper to about half way and flip your pieces so the lining fabrics are on each other and the main fabrics are on each other.


Pin and sew around the purse. Start at the bottom of the lining sewing and leave about a 3" opening for turning.


Now turn your purse right side out. Whip stitch or machine stitch your opening, turn it down in your purse.

Now, wasn't that just easy peasy!


Wednesday, August 8, 2012

How To Make A Jersey Ruffle Hairbow


The other day I made the Jersey Knit Ruffle Dress and I came up with this Jersey Ruffle Hairbow so I could incorporate my shirt color in with my girls' outfits. I was going out on a whim, but I love the way it turned out! This is what goes through my mind as I lay awake in bed at night... sewing and crafting! hehe

You will need:
* Jersey knit material (I used the bottom portion of my cut shirt)
* Button
* Lined Clip
* Felt
* Hot Glue Gun

Cut a 2 inch strip of your jersey knit. I used the bottom portion of my cut shirt and cute the sides were it was sewn together. This made two strips... get it?


Sew the 2 ends of your strip to one another, making a loop.

Now make your ruffled edges on your jersey strips.

Set your machine to a zigzag stitch and set the length to about 0.5 . Pull on the front and back of your jersey knit as your sew the small zigzag stitch on the edge. Your pulling and stretching will creates the cute ruffled end.

I got happy with the ruffled edging and done it before sewing my end together. Whoops! But you get the gist.


Now set your straight stitch length as long as it will go, aka the basting stitch, and stitch the top part of your loop (DO NOT BACK-STITCH)all the way around. Also Leave both your bobbin thread and top thread pulled out a few inches before starting.


Once you have done that, pull on your bobbin thread and ruffle your loop.

Ruffle it enough so the edges will be covered by your button.


Cut out a 2" circle of felt.

Now, glue your ruffled flower onto the felt circle.

The back should look like this now.

Glue your button center on.

Glue a lined alligator clip to the back and you are set to go!