Pages
▼
Sunday, May 27, 2012
Sewn Tutu
Tutus are so popular right now! They are adorable, aren't they?!
I started out making the tied tutus but after I made one for my girls, I realized that they were taking off the tulle. Not good! So, I gave a sewn tutu a whirl and I love them! They are super easy!
You will need:
* Tulle ( get creative... their are all sorts out there.... regular, shiny, glitter, etc...)
* .75" Elastic
I use the tulle that is on a roll that has a 6" width. The amount you need will depend on the size you are doing and the fullness you want.
I'm doing a newborn size in this tutorial. I cut my elastic for the waist at 16". I wanted my length to be 8", so I doubled it and cut my tulle to 16" lengths. (Once folded it will be the 8" desired length)
Get stacks going on of each color that you want to use. Fold a piece of tulle in half and sew a 1" seam allowance. Just continue to fold pieces of your tulle and add them one after another.
Before you know it, you will have a bunch of fluffy goodness going on!
When you think you are satisfied with the fullness, it's time to get the elastic in! (If you want to add more after you have threaded the elastic through, no problem, just slide off of few pieces and attach more tulle)
Stick a safety pin through one end of your elastic and slide it into the 1" casting you've been sewing. I like to attach the other end of the elastic to the first piece I went through so it doesn't come out.
Once you get to the other side and you're satisfied with the fullness, sew your elastic pieces together using a 1/2" seam allowance.
After I get done, I do like to go around the bottom edge just to make sure everything is nice and neat.
You can still add a ribbon bow, flower or whatever if you want to!
That's it! All done!
Friday, May 18, 2012
Hooded Towel
I had a request for a hooded towel, so here it is! Great for bath time or pool time! Ahhh.... I just love a project that I know can get lots of use!
Ok... time for the fun to begin! Yay!
You will need:
* 1 Hand Towel (this will do two hoods)
* 1 Towel (two towels if you plan on using the other half of the hand towel too)
If you plan on doing a design on the hood, go ahead and get that out of the way. To see how I embroider on towels, click HERE
So, now that your ready to start sewing....
Take your hand towel and cut it to 10"
Fold your hood in half, right sides together. Sew a 1/2" seam and serge or zigzag stitch where you cut it.
Flip your hood right sides out. This is what the front and back should now look like.
This step is optional. I like it, but you could leave it out. I like to make a little loop to hang mine from, plus it lets you use what little extra towel center you would have left over if making two.
On the side of the hand towel that is cut (the part you haven't used) cut 2 1/2" across, then cut the strip to 6" long.
Fold long sides together and sew 1/4", turn it right sides out.
Find the center of your large towel and pin your loop if you done one. The loop and hood will be laid on the portion of the towel you're using for the outside.
Find the center of your hood and pin it centered up with your large towel. (The loop will be sandwiched between them)
Sew 5/8", sewing and back stitching a few times on the ends and over the loop.
I made this for a birthday gift for a sweet girl who just got a big girl pool and was so excited! Hopefully she will get lots of use out of it!
Embroidering on Towels
So, I actually do a lot of towel projects. Either a hooded towel, towel sets as gifts, or for myself of course! hehe
For embroidering on towels, I hoop a piece of tear away stabilizer. Spray adhesive on my tear away and pin the towel to it.
Don't try to hoop your towel! It's just a big pain... way to thick!
Once you get it pinned, spray lightly a piece of water soluble stabilizer (WWS) and lay it on top. This will keep all the little pokeys from coming through while embroidering.
When I first started learning how to do embroidery, I thought that surely the WWS wouldn't make that big of a difference. Boy oh boy... I was wrong. Don't embroider towels without it! They look so much nicer!
Thursday, May 17, 2012
Baby Bubble Gown
As soon as I saw the adorable Baby Bubble Gown from DigiStitches, I fell in love!
I Made Ella some new gowns for her arrival, of course! hehe The instructions are super easy to follow!
Here are the ones I done for Ella! I can't wait to see her all dressed up in them!
I'm sure I will be doing many more of these for future gifts!
I got the Big Sister/ Lil Sister from River Mill Embroidery
This will be Ella's coming home outfit. Anyone who knows my husband knows he is a HUGE Alabama fan! So, of course she had to come home sporting daddy's team!
For the Bama Fans out there, I got the design from Shabby Chic Now
And one for kicks! I made the girls matching Big Sister Shirts to match Ella's Little Sister Bubble Gown. I'm very pleased with how they turned out and so are the girls! They can't wait to wear their Big Sister shirts!
If you have basic sewing skills, this would be a great little project you could have some fun with! I got the pattern HERE
Wednesday, May 16, 2012
Button Bracelet
For a Tutorial on the Button Necklace, click HERE
You will Need:
* Chain
* Jump Rings
* Closure
* Buttons
Take a piece of your chain to fit your wrist. I used 6 1/2" for mine. Using your smaller buttons, attach 2 buttons onto a jump ring and attach the jump ring on your chain. Keep doing this until you get as many buttons you want on your bracelet. I used 26 buttons total for my bracelet.
Attach a Jump Ring and closure to each end of your chain.
That's it! Aren't they simple and cute!
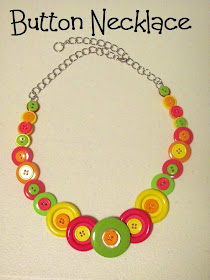
Button Necklace
For a tutorial on the Button Bracelet, click HERE
You Will Need:
* Buttons of different sizes
* wire cutters
* Needle nose pliers
* 28" of 24 gauge wire
* Jump Rings
* Chain
* Toggle Clasp or the adjustable (this usually comes with your chain)
* Jewelry & Metal Glue
Lay out your buttons how you want them to look on your necklace. I did end up adding more to mine the farther along I got. It's really just a preference on how far you want the buttons to be around the necklace and how large the buttons are you are using. I used 43 buttons total of different sizes.
Cut 28" of your wire (you won't need to use all of it, just enough to suite your amount of buttons), fold in in half to find the center and start with your center button. Thread the wire through the button/ buttons starting at the back, threading to the front and through the back again. Continue until you are satisfied with your amount of buttons. I go from left to right putting buttons on opposed to doing one side at a time.
Once you get the amount of buttons on to your satisfaction cut your wire to were only about 1 1/2" is sticking up on each side. Take you needle nose pliers and roll the wire down.
Add a jump ring to each side you rolled down also attaching a 4 1/2" piece of chain to each side.
Attach a jump ring to your ends along with your closure. You could use a toggle set or an adjustable one. I used the adjustable.
Take your craft glue and glue down the wire you rolled down earlier. I like to give it overnight to sit.
Wednesday, May 9, 2012
Baby Tag Blankie
I love these little tag blankies! They are just so cute!
You will need:
* Ribbons
* 2 different fabrics
Cut 2 13"x13" squares from your fabric choices. (One of each) I like to use flannel for one side and minky for the other.
Cut your ribbons at 5" long. I had 4 different ribbons (16 total) Use different sizes and textures. Babies love it!
Pin your ribbons on one of your fabrics and sew 1/4" around the entire piece. Be sure to go over the ribbon pieces a few times each.
Lay your other fabric piece on top of the other (right sides together), pin and sew 1/2". Leave about a 3" opening.
Clip your corners for less bulk.
Turn your tag blankie right sides out through the opening you left. Stitch around the entire blankie about 1/4".
You're all done!