Showing posts with label DIY Projects. Show all posts

Monday, January 20, 2014

How to make a cake plate cheap

So, a few months back I wanted to give my sister in law a little shower. This was going to be her 2 daughter, with 2 boys in between the girls. It had been 8 years since she had a baby girl and girl things have just gotten way more cute since then. So, a shower was a must! 

My sister in law didn't know about the shower and I usually use her cake stand and cupcakes stands if I ever need them. I didn't want to pay a bunch of money for a shabby chic looking cake stand and cupcake holder.

So I channeled my inner "thrifty person" and I made THREE stands for $5!!!

Get three plates that are flat or almost flat on the bottom. 

Get three crystal candlesticks and use E6000 to glue the top of the candlestick to the bottom of the plates and VIOLA... you have cake stands/ cupcakes stands for almost nothing!

Monday, July 22, 2013

How to make a pettiskirt

What little girl wouldn't want a pettiskirt!?


I made Ella a pettiskirt to go under her "minnie" dress for her birthday and she loved it!

I actually paid for a pettiskirt pattern and it was HORRIBLE! No pictures at all except for 1 of the finished project and the directions were not very good at all either. I didn't read much until I knew I had made a mistake buying it. (And I seriously hate giving bad reviews! Not fun!)

So, I used the tutorial from Make It & Love It. I made a few minor tweaks but for the most part, this was the best explained way to make a pettiskirt! Making a pettiskirt does take a bit of time but it's so rewarding seeing the finished project and the little cutie twirling and loving it! Just take your time and don't worry... YOU CAN DO IT!!! 


Sunday, March 17, 2013

How To Make a Custom Basket Liner

Making a basket liner is easy, fun and a great way to customize all your cute baskets for a fraction of the cost! 


See my great handmade soaps peeking out??? That is because I have the best SIL that makes some great smelling handmade soaps!!!

 Ok... so PLEASE forgive my inability to draw! Hopefully I can explain it better in words than what I draw!

Use 1/2" seam allowance.

First, you will need to measure the width (RED) by holding your measuring tape 2" on the outside of your basket... go down inside the basket, across the bottom, up the other side and 2" of the outside.
Mine was 19".

Now, measure you side (BLUE) by holding your measuring tape 2" on the outside of your basket and going down on the inside, stopping at the bottom. Remember, you will cut two of these.
Mine was 7".

Now on the outside, measure one long side and one short side to get your width for each.


My pieces measured 19"x9" and 7"x5".

Add 2" to all measurements for your cutting. My cut measurements were
21"x11" and 9"x7".

Sew your two smaller pieces onto your large piece.


Take you smaller pieces one at a time and pin the to the other end of your large piece. Sew. This will look like a bag with a whole in the bottom like above.


Time to sew your bottom up! One side at a time, pin and sew you edges together.


Fold and iron you top edge 1/4" and then fold and iron down a 1/2".

Sew around entire top except a few inches for the elastic.


To get the amount of elastic you need, you can just measure around your basket and subtract about 3-4".

Feed your elastic through the opening with your trusty safety pin.

Sew the ends of your elastic together.

Sew you opening shut. Add a little bow if you would like and Viola! A custom made basket liner!

I hope this didn't confuse anyone! This was kind of a toughy to explain. Maybe next time I do a toughy, I'll do a video instead. It would probably be easier.


Friday, February 1, 2013

Love Light Laughter & Chocolate

Today I read a blog post by Love Light Laughter & Chocolate. 

The blog is written by a mother named Kim and in this post she tells her heart wrenching story and what unimaginable pain she and her family went through. I won't go into any details b/c it is a MUST READ!

 Be prepared to cry, hold your babies a little closer and most of all... be prepared to make a trip to the hardware store! 

Go on over to Love Light Laughter & Chocolate and give Kim some Love! 

Friday, December 7, 2012

Salt Dough Christmas Ornaments

The other day I had a friend make some of these for her kids and I thought it was so cute! Of course I had to share how to do them! 

 You Will Need:
* 1 cup of flour
* 1 cup of salt
* 1/2 cup of water
 
 Here are some that we made!
My Sweet Ella's Ornament!
Yeah, that's yellow and pink but the picture looks orange. hmmm

My sweet Brenna's ornament!

My sweet Emma's ornament!


So, these cute little ornaments are really easy to do! Just knead the ingredients listed above in a bowl until it's about the consistency of play dough.


 Roll out your dough on a piece of wax paper. Make the dough around 1/4" thick.
Make your designs. Cookie cutters would come in really handy! Wouldn't you know I couldn't find any, so I used bowls to make a circle outline for ours.


Place your cut outs on a baking sheet lined with wax paper. 
Take a straw and make holes for the ribbon to be tied through.

Bake at 200° for about 2 hours or until hard.
The smallest one we made was done in about an hour but the larger ones took about two hours.

After they are all done and cooled off... Time for the fun part, PAINT!
I let the girls paint them however they wanted, let them dry, then went over their hand print with red paint so they could be seen.

Those other two are mine. Not the best but it was fun! I need to invest in some paint pens for projects like this!

My girls HAD to have glitter, so I had some of this spray glitter in my craft stash. 
After the paint dried, we sprayed the ornaments with glitter twice and then sealed them using the Mod Podge clear acrylic sealer.

Just for fun, here are the ones I done. Next time, I'm getting cookie cutters and paint pens! Hehe

Just in case you're wondering... yep, that special date is the day we were married!

Happy Memory Making!
Thursday, November 8, 2012

Bowl A Ghost

We had our Halloween party last weekend for the kiddos and it was a lot of fun!
Bowl A Ghost is a game that the kiddos played outside and they loved it! 
I have the "bowling pins" sitting on my outside mat b/c our yard is a little uneven and the "pins" sat much better on it.

They enjoyed helping make them too!


I got a small pumpkin (out of the grocery isle) without a stem and they used it as the ball.

All you do is paint 15 empty 2 liter bottles and paint them white. After they dry, use a permanent marker or paint to draw a ghost face on them.

Monday, October 1, 2012

Changing Table Cover

 I wanted to make a nice, soft little cover for the changing table at church and I found this great little tutorial at Prudent Baby.

I used Minky that I found on sale at JoAnn's.  
 If you plan on using Minky like I did, remember to use your Walking Foot.  


Sunday, September 30, 2012

How To Make Goo


Who doesn't like GOO, right!? My niece and daughters loved making their own ooey, gooey, slimy, yucky GOO and it is so easy!


It's a great little project for rainy days or Halloween that is coming up fast!


You Will Need:
* Liquid Starch (You can find it around the fabric softeners)
* Glue ( Like Elmer's School Glue)
* Bowl
* Food Coloring
* Spoon (optional... we liked using our hands... hehe!)


Put 1/4 cup of liquid starch and 1/4 cup of glue into your bowl... add your color of choice of food coloring and mix with your spoon or your hands. Mix until it is a glob that holds together. The more you mix, the stronger it will be.

FYI... My daughter got some on her shirt that I didn't notice until laundry day and it came out no problem!


Have fun making GOO with the Kiddos!!!

Friday, September 14, 2012

Printable Fabric Sheets

I have just recently braved up to do a large quilt for my mother-in-law for Christmas. I've done small things but nothing to big.

(Yes... this year I am actually starting early! Woo Hoo!)

Anyhoo... I wanted something special, hence the photo memory quilt, and I found these Colorfast Fabric Sheets. I must say... they are wonderful! My husband even thought they were actual pictures until he felt of the fabric!

When I done the Colorfast Treatment on them so they would hold their color with washing... I was nervous and held my breathe. Guess what... they turned out perfect!

(Oh yeah... doin' my happy dance!!!)

If you decide to make a project using these Colorfast Fabric Sheets, be sure to get the right one for your project. If it will need to be washed, make sure to get the washable fabric sheets or your pictures will ruin. (Trust me! Don't ask... just trust me!)


Here is one of my squares for the quilt with a picture of my hubby's grandfather & grandmother. I just love this picture of them! He's got a big smile on his face & she's looking at him with this beautiful, soft smile! You can just feel the love they had by looking at the picture! (I hope someone says that about me and my hubby one day.) They were definitely an example of love!


Well, lets get some lunch in my girls' bellies so mama can sew right thru nap time! Hehe!! I'm so excited!!!

Happy Crafting


Saturday, September 1, 2012

Button Tree Canvas Art


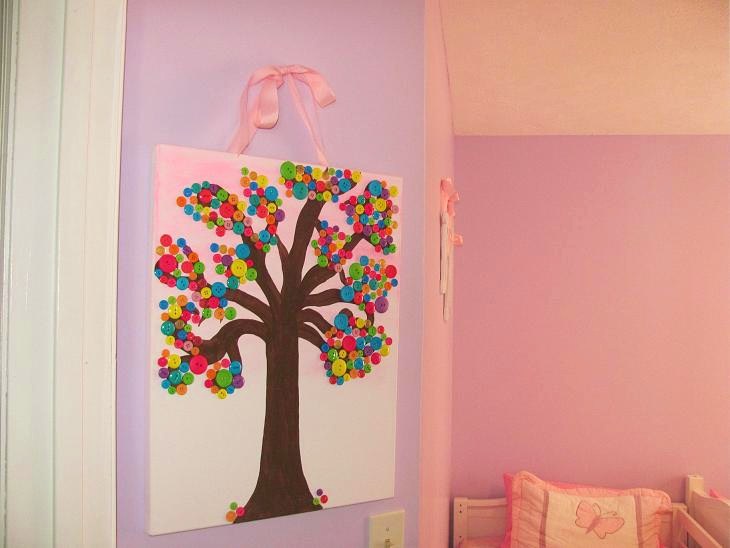
OK... I love the Button Tree! I did this cute little button tree for my girls' room. I wanted it bright and just cheerful for them. It reminds me of what a candy tree would look like... if their were candy trees!

This is also a fun project for kids. My girls liked getting to help place the buttons on!

You will Need:
* Canvas (any size)
* Paint
* Buttons
* Craft Glue
* Paint brushes
* Pencil

Paint your canvas in the shade you want. To get the faded look just start at the top and keep blending it in. You can paint the whole thing or not paint it at all. It's up to you.

Take a pencil and draw your tree. It doesn't have to be perfect. The buttons will cover up any mistakes you may make. Drawing is not a strong point of mine, so don't look to close to my tree.

Paint your tree

Play around with your buttons, find a place you like them and glue them down. If you would like to use any buttons that have the "hook" on the back, just take a craft knife or box cutter (something with a sharp point) and make a SMALL slit where you want it. Glue the back while sticking the "hook" thru the slit you made.

When gluing your buttons down, use a craft Glue like E6000 or Craft Art. I wouldn't hot glue them. The hot glue doesn't hold well to the canvas and pops off easily. If you do dots on the back of your buttons, use a very small amount (you don't need a lot). I like to take a small flat brush and brush the glue on.

You can add hardware to hang it or ribbon. I used ribbon since it was going in the girls' room.

Here are some pictures of it hanging in their room. It was kinda hard to get a good picture. Their room has an odd angle when you first walk in.


I hope you enjoyed the button tree! They are super fun to make and very easy! Their are so many things you can do with them too. You can make them bright and cheerful or a little more sophisticated.

Happy Crafting!

Tuesday, August 28, 2012

How To Turn Pants Into A Skirt

I had some capris that I never wore anymore and I also needed a new jean skirt, so I tried my hand at turning them into a skirt! I loved it so much, I went the next day and got my girls 2 pair of pants at our local Consignment shop and made them one each too! Love them!!! It doesn't hurt that they are super easy either! Yay!


You will Need:
* Pants/ Capris
* Seam Ripper
* Material for the center if you don't plan on using your cut off leg pieces for the center.

Here are my Capris that I never wore, Before.


Cut your capris or pants off 1" longer than you want the finished product to be.

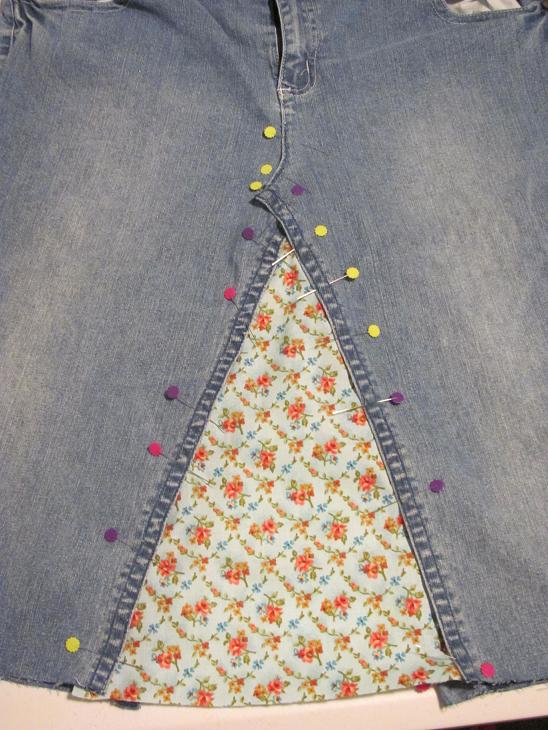
Take your trusty Seam Ripper and seam rip the inner portion and up the front and back crotch area just enough to get your centers to lay flat.

If you don't have a Seam Ripper, GET ONE! They are awesome and doing this without one would be a huge headache!!!


Line up the crotch area of your pants, making it lay flat. Do this to both the front and back area.


Pin your front and back area how you want it to look. Remember the middle will be filled in later.


Take a piece of paper (you may even need to tape a few together to get it big enough), place it under the part of your skirt that needs filled in and trace.


After you trace both the front and back on paper, draw a line 1/2" out from your original outline. Cut your pattern on this line.


Cut your fabric pieces out using your template you made and pin them in place.

You may also use the left over scraps from the pants you cut off.


Sew around your new center AND remember to also sew down the front and back crotch areas that are now laying flat.

You can cut off any extra jean left over from the crotch area that would be bothersome.

You can serge or zigzag your piece you added now if you would like.


Fold over your bottom seam 1/2" and them another 1/2" and sew down. If you aren't comfortable with sewing through such thick material and it being folded a few times, then you can also serge or zigzag your edge, fold over 1" and sew the hem.

That's it! It's really not as hard as it may look! It takes practically no time at all once you get the first pair done and get into the grove!

Happy Sewing!