Showing posts with label Children. Show all posts

Monday, July 22, 2013

How to make a pettiskirt

What little girl wouldn't want a pettiskirt!?


I made Ella a pettiskirt to go under her "minnie" dress for her birthday and she loved it!

I actually paid for a pettiskirt pattern and it was HORRIBLE! No pictures at all except for 1 of the finished project and the directions were not very good at all either. I didn't read much until I knew I had made a mistake buying it. (And I seriously hate giving bad reviews! Not fun!)

So, I used the tutorial from Make It & Love It. I made a few minor tweaks but for the most part, this was the best explained way to make a pettiskirt! Making a pettiskirt does take a bit of time but it's so rewarding seeing the finished project and the little cutie twirling and loving it! Just take your time and don't worry... YOU CAN DO IT!!! 


Friday, June 7, 2013

Mackenzie Dress

I done a Minnie Mouse themed party for my youngest daughter's first birthday. :( Makes me kinda sad that my baby is already a year old!

I wanted to make her a dress similar to Minnie Mouses and I picked the Mackenzie dress from Fairytale Patterns. So glad I did! I LOVE how the dress turned out and it was super easy! I did make a pettiskirt to go underneath just to make it a little more frilly and fluffy though. This is a pattern that I would definitely recommend and I'll be using it again too!


Friday, February 1, 2013

Love Light Laughter & Chocolate

Today I read a blog post by Love Light Laughter & Chocolate. 

The blog is written by a mother named Kim and in this post she tells her heart wrenching story and what unimaginable pain she and her family went through. I won't go into any details b/c it is a MUST READ!

 Be prepared to cry, hold your babies a little closer and most of all... be prepared to make a trip to the hardware store! 

Go on over to Love Light Laughter & Chocolate and give Kim some Love! 

Saturday, September 1, 2012

Button Tree Canvas Art


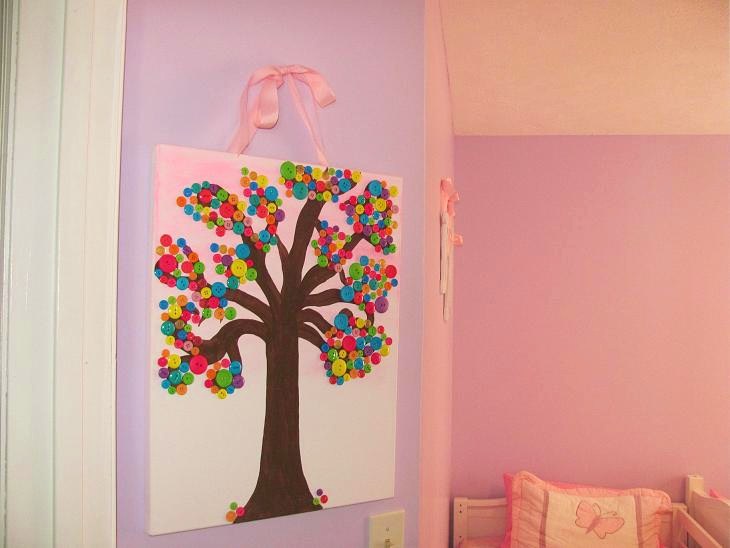
OK... I love the Button Tree! I did this cute little button tree for my girls' room. I wanted it bright and just cheerful for them. It reminds me of what a candy tree would look like... if their were candy trees!

This is also a fun project for kids. My girls liked getting to help place the buttons on!

You will Need:
* Canvas (any size)
* Paint
* Buttons
* Craft Glue
* Paint brushes
* Pencil

Paint your canvas in the shade you want. To get the faded look just start at the top and keep blending it in. You can paint the whole thing or not paint it at all. It's up to you.

Take a pencil and draw your tree. It doesn't have to be perfect. The buttons will cover up any mistakes you may make. Drawing is not a strong point of mine, so don't look to close to my tree.

Paint your tree

Play around with your buttons, find a place you like them and glue them down. If you would like to use any buttons that have the "hook" on the back, just take a craft knife or box cutter (something with a sharp point) and make a SMALL slit where you want it. Glue the back while sticking the "hook" thru the slit you made.

When gluing your buttons down, use a craft Glue like E6000 or Craft Art. I wouldn't hot glue them. The hot glue doesn't hold well to the canvas and pops off easily. If you do dots on the back of your buttons, use a very small amount (you don't need a lot). I like to take a small flat brush and brush the glue on.

You can add hardware to hang it or ribbon. I used ribbon since it was going in the girls' room.

Here are some pictures of it hanging in their room. It was kinda hard to get a good picture. Their room has an odd angle when you first walk in.


I hope you enjoyed the button tree! They are super fun to make and very easy! Their are so many things you can do with them too. You can make them bright and cheerful or a little more sophisticated.

Happy Crafting!

Tuesday, August 28, 2012

How To Turn Pants Into A Skirt

I had some capris that I never wore anymore and I also needed a new jean skirt, so I tried my hand at turning them into a skirt! I loved it so much, I went the next day and got my girls 2 pair of pants at our local Consignment shop and made them one each too! Love them!!! It doesn't hurt that they are super easy either! Yay!


You will Need:
* Pants/ Capris
* Seam Ripper
* Material for the center if you don't plan on using your cut off leg pieces for the center.

Here are my Capris that I never wore, Before.


Cut your capris or pants off 1" longer than you want the finished product to be.

Take your trusty Seam Ripper and seam rip the inner portion and up the front and back crotch area just enough to get your centers to lay flat.

If you don't have a Seam Ripper, GET ONE! They are awesome and doing this without one would be a huge headache!!!


Line up the crotch area of your pants, making it lay flat. Do this to both the front and back area.


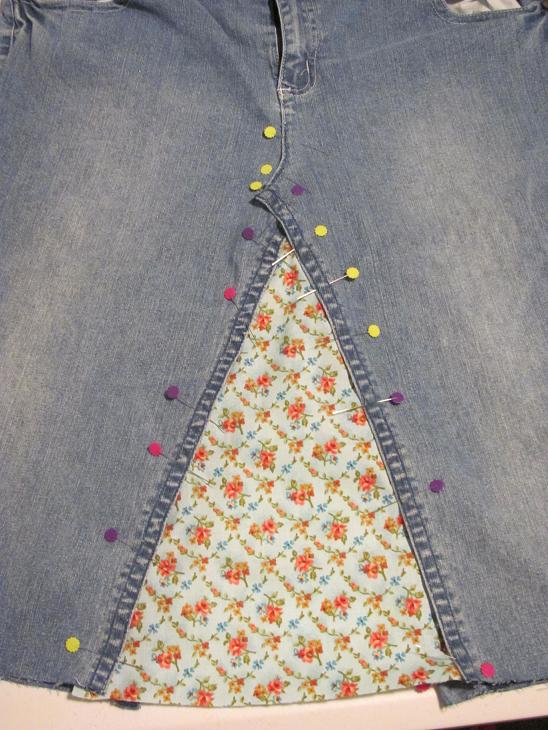
Pin your front and back area how you want it to look. Remember the middle will be filled in later.


Take a piece of paper (you may even need to tape a few together to get it big enough), place it under the part of your skirt that needs filled in and trace.


After you trace both the front and back on paper, draw a line 1/2" out from your original outline. Cut your pattern on this line.


Cut your fabric pieces out using your template you made and pin them in place.

You may also use the left over scraps from the pants you cut off.


Sew around your new center AND remember to also sew down the front and back crotch areas that are now laying flat.

You can cut off any extra jean left over from the crotch area that would be bothersome.

You can serge or zigzag your piece you added now if you would like.


Fold over your bottom seam 1/2" and them another 1/2" and sew down. If you aren't comfortable with sewing through such thick material and it being folded a few times, then you can also serge or zigzag your edge, fold over 1" and sew the hem.

That's it! It's really not as hard as it may look! It takes practically no time at all once you get the first pair done and get into the grove!

Happy Sewing!


Tuesday, August 21, 2012

Applique Ballet Ribbon Shirt

I saw a shirt a while back in a store that was appliqued ballet shoes and actual ribbon. I thought it was so cute but.... I have 3 girls and I knew I could make all 3 for the price of one. Grant it, my "ballet shoe" is no where near perfect but I think it turned out nicely.


You will Need:
* Ribbon
* 2 Contrasting Fabrics
* Heat n Bond Lite Sewable
* Make your own shoe template or Download My FREE Template Here

Cut your ribbon as long as you would like your "laces" to be. Twist it loosely and pin it in place, overlapping the two top ends.

Iron on your sewable Heat n Bond Lite to the back of your two fabrics (leave on paper backing) and cut two of each of the template.


Peal off the paper backing on your pieces and iron them down like shown in the picture. Sew around each piece like shown.


Now, sew your ribbon how you have it pinned down. Make a bow, heat seal the ends with a lighter and sew it on top where the two ribbons meet.

That's it! You're all done! Easy Peasy, right?! Now if you happen to have an embroidery machine, you could do the applique on the embroidery machine and get the same affect. Just remember to place the ribbons underneath your fabric.

Happy Crafting!


Wednesday, August 8, 2012

How To Make A Jersey Ruffle Hairbow


The other day I made the Jersey Knit Ruffle Dress and I came up with this Jersey Ruffle Hairbow so I could incorporate my shirt color in with my girls' outfits. I was going out on a whim, but I love the way it turned out! This is what goes through my mind as I lay awake in bed at night... sewing and crafting! hehe

You will need:
* Jersey knit material (I used the bottom portion of my cut shirt)
* Button
* Lined Clip
* Felt
* Hot Glue Gun

Cut a 2 inch strip of your jersey knit. I used the bottom portion of my cut shirt and cute the sides were it was sewn together. This made two strips... get it?


Sew the 2 ends of your strip to one another, making a loop.

Now make your ruffled edges on your jersey strips.

Set your machine to a zigzag stitch and set the length to about 0.5 . Pull on the front and back of your jersey knit as your sew the small zigzag stitch on the edge. Your pulling and stretching will creates the cute ruffled end.

I got happy with the ruffled edging and done it before sewing my end together. Whoops! But you get the gist.


Now set your straight stitch length as long as it will go, aka the basting stitch, and stitch the top part of your loop (DO NOT BACK-STITCH)all the way around. Also Leave both your bobbin thread and top thread pulled out a few inches before starting.


Once you have done that, pull on your bobbin thread and ruffle your loop.

Ruffle it enough so the edges will be covered by your button.


Cut out a 2" circle of felt.

Now, glue your ruffled flower onto the felt circle.

The back should look like this now.

Glue your button center on.

Glue a lined alligator clip to the back and you are set to go!


Tuesday, August 7, 2012

How To Make A Tiered Jersey Ruffle Maxi Dress


The other day I went on the hunt for a new church dress. By the end of the day I was so frustrated and still didn't have myself a new dress. Every dress I saw was either older looking (I'm only 26) or they were going to show my bottom or top half. Really?! It was actually kinda pathetic. Seriously, is it to much to ask to be able to find something young looking and modest?! Ok... rant over!

So, I decided to make my own dress. I have seen these Maxi dresses before and thought it would be fairly easy. I also made the Jersey Ruffle Hair bows from my shirt leftovers.

In this tutorial I am doing my youngest daughter's dress.

Don't look to closely to our group photo. Hubby took it and the kiddos kept wanting to run out of the picture. So I was trying to smile and play "watch dog". hehe

You will Need:
* Fitted Shirt
* Jersey Knit Material

The amount of jersey knit you will need depends on the size you are doing. FYI... if you are doing multiple dresses like I did, you can buy a Jersey Knit Sheet Set for about $21! Also, jersey knit is great because guess what... it doesn't fray!

Ok, shall we begin?

First, try the shirt on and mark with a water soluble pen where you want to cut it. (Ooops! I forgot to take a picture of the cut shirt.)

After you cut the bottom part off your shirt, measure the bottom of your shirt and double that number. Ex. If it's 9 1/2" across the front, then your entire shirt measurement is 19".


Now measure from the bottom of your cut shirt to the length you want. Ex. mine was 14". So I would cut 2 pieces of jersey knit 14" (length) x 19" (width). This will be the base to sew your ruffles to. Sew the sides together, making one big loop/tube.


Time to cut your ruffle strips. To get your measurements, take the length of the big piece you just cut and divide it by the number of ruffles you want. This will give you the height the ruffles need to be. Ex. I just cut my ruffles 4" x 19" (width from earlier, remember?) You will cut 2 strips at your measurement per ruffle. I wanted 4 ruffles, so I cut 8 4"x19" strips. I only took a picture of 4.


Take 2 of your ruffle strips and sew each end together, making a loop. Do this for all your strips.

Now it's time to ruffle the ends of your loops.

Set your machine on a zigzag stitch and set the length to your liking. I set mine length to 0.5

See here?


Do this for each loop.

Sew the small zigzag stitch on the edge of your fabric. While sewing, pull both the front and the back of the fabric stretching it. This will give you the ruffled edge. Neat huh?


After all your ruffle ends have been ruffled, place them one at a time around your base piece from earlier. Pin and sew.

Once you have sewn all ruffles on to your base piece, turn your piece inside out and place your cut shirt inside. Your shirt stays right sides out. Your skirt portion and shirt will be right sides together.


Pleat and pin until your skirt portion is fitted to your shirt size. Sew.

Turn your dress right sides out and try it on, checking your length. If you're happy with it, ruffle the main end of your dress.


That's it! All done! It's not hard at all, just a little time consuming. But, personally I think ruffles are worth the time! I just love some ruffles!

My dress has a more fitted waist. I just ruffled the edge of one long piece and sewed it around the waist part except for about 3 inches where it ties. Then I added to flower hair bow to my tie to give it a little extra something. I also added a piece of cream colored lace under my v-neck shirt.