Friday, July 20, 2012

Fun Learning Project

My oldest baby will be heading to school next year (I'm having anxiety already) and I thought this would be a neat little book for her to practice and she can take it in the car.


I personally made each activity page and the PDF files, please DO NOT copy them and claim as your own work. You are welcome to download as many as you wish. Thanks!


You will Need:
* Download the file(s) you want below
* 1 4x6 picture album
* Dry erase marker
* Piece of cloth for erasing

I have drawn a 4x6 area around each activity. Cut on those lines and it should fit right into your album pages.

I have posted a picture above each download so you will know if it's one you wish to download.

Simply download the files you want and print them (make sure scaling is set to none). Cut them out and place the in your 4x6 photo album. Using the dry erase marker, your kiddo can draw on the album pages and wipe away the marker with a cloth. Neat huh?

FYI... Stick man is the same as hangman basically (without the hanging). We just draw a stick man in the box. I just don't like my kid enjoying a game that involves hanging "someone". Call me odd... I just worry about their little minds and all they absorb.
Click To Download Free PDF Activity 1

Click To Download Free PDF Activity 2

Click To Download Free PDF Activity 3


Click To Download Free PDF Activity 4


Click To Download Free PDF Activity 5


Click To Download Free PDF Activity 6


Click To Download Free PDF Activity 7


Click To Download Free PDF Activity 8


Glow Jars


I Love these Glow Jars aka Firefly Jars! Their are two ways to make these, one lasting a lot longer. Now you can use glow sticks (these Glow much brighter but don't last but about one day) OR you can use Glow in the dark paint (This lasts much longer b.c it charges in the light but doesn't glow as bright). It's all up to you.

You will Need:
* Jars with Lids
* Glow Sticks OR Glow in the dark paint
* Paintbrush if using glow in the dark paint

If you are using Glow Sticks:

Make sure your jars are clean and dry.

Break your glow stick so it will glow.

Cut the end off and shake the contents in the glow stick all around in your jar.

You need to be extra careful with the Glow Sticks as they do have glass in them.

That's it if your doing the glow sticks.


If you are using Glow In The Dark Paint

Make sure your jars are clean and dry.

Take the end of your brush and dot the paint onto the inside of the jars. The more you dot, the more they will glow.

I personally think these jars are awesome. I've made both and like both. I think these would also be really cute for an evening wedding reception for centerpieces or on the deck. What a conversation starter!


Saturday, July 14, 2012

How to make an ironing board cover

I decided I needed to make myself a new ironing board cover. Mine was so gross! It had all sorts of things on it from my projects. So, a new one was definitely in order!


You will need:
* 2 yards of fabric
* 1/4 inch elastic
* Water soluble pen
* ruler

Preshrink your fabric by washing and drying and then give it a good iron so it will be nice and crisp.


Lay your fabric wrong side up on a table or the floor and place your ironing board on it.


Take your ruler and measure out a 3 inch mark with the water soluble pen every so far all the way around the ironing board. This will give you your guide to cut out your pattern.


Iron the edges down 1/2 inch


Iron the edges down another 1/2 inch and sew. Leave about a 3 inch opening for the elastic.


Now to get the amount of elastic I needed, I just done a little over half way around the board, going around the top. Like in the picture below.


Once you cut your elastic to the amount needed. Time to thread it through the casting. I pin one end to my project so it doesn't get lost and do another safety pin on the other end the thread it through.


Once your elastic is pulled through to the other side, sew the two ends together and pull all the elastic in the casting. Sew your opening up.


Wala! Now you've got yourself a fast and cute new ironing board cover! Exciting isn't it?


Wednesday, July 11, 2012

Kiddie Pool Cover

The other day my hubby said I needed to find or make the girls a pool cover b/c creepy crawlies kept getting in it. Well, I searched high and low and let me tell you... I couldn't find anything! I couldn't find one already made or even a tutorial on how to make one! So, here is how I made our Kiddie Pool Cover! It is so simple and the best part... it's WASHABLE!!! Yay!


You Will Need:
* 4 Yards of fabric
* 3 yards of 3/4 inch elastic

Our kiddie pool Measures 58" across, but you can use these same steps for any size. The bigger or smaller the pool, you may need to use more or less elastic and fabric though.

Take your 4 yards of fabric and cut it in half to were you have 2 pieces of 2 yards.
Unfold your fabric, right sides together (on one long section) sew a one inch seam and press it open.


Once sewn together, you will have one giant piece.


Now, I am one of those people who can not draw a good circle to save my life! But, I had an idea on how to make one this big.

Center your kiddie pool on top of your giant piece of fabric, wrong side of fabric facing up.


Take a ruler and measure 7" out from the side of the pool every so far with a water soluble pen. This will give you a guide to go by to cut the circle out.


Iron down a 1/2" seam around the entire circle.

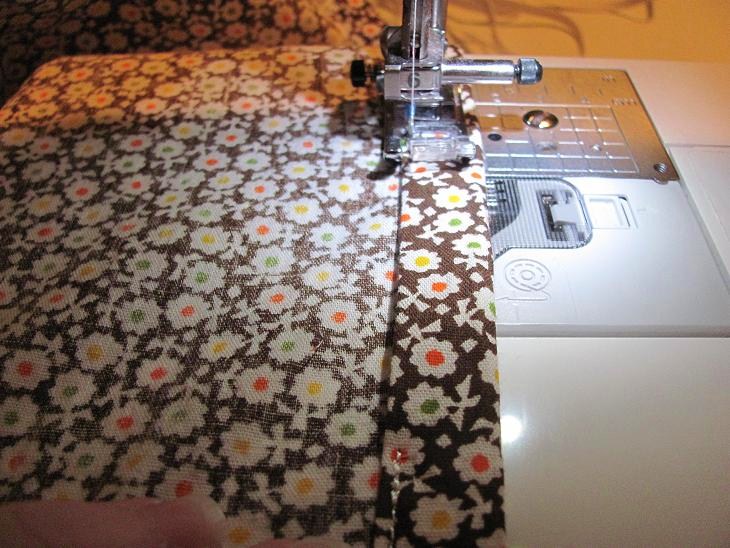
Iron down a 1" seam around the entire circle and sew. Leave about a 3" opening for the casting for the elastic.


Put your elastic in your casting. The easiest way for me is to attach a safety pin to one end of the elastic and attach it to a section of the opening (so it won't get lost) and attach another safety pin to the other end and use it as a guide to slide your elastic through. Try to keep the elastic straight and not let it twist.

Once you get your elastic all in, sew your elastic ends together.

Sew your opening closed.


Wala! Now you have a cute cover for your kiddie pool to keep those pesky creepy crawlies out! I also made mine tight enough so no slithering snakes can get in. Cause with this heat, lets face it, our babies' pools are a hot spot for snakes! YIKES!


Initial Plate

I had an old wooden plate from an old project that didn't turn out the way I wanted, so I decided to vamp it up and use it as a center plate for my table.


You will need:
* Wooden Plate
* Wooden OR cardboard letter
* Paint
* Fabric of choice
* Sponge Brush
* Mod Podge (Of course!)

Paint your wooden plate front and back with your color of choice.


Go ahead and paint your letter with your color of choice and let it be drying.

After your paint dries on your plate.

Take a piece of fabric, iron it out. Take your ironed piece, lay it right side down and one the back side of your fabric draw your circle or pattern with a washable pen. Cut out your circle or other shape.

Mod Podge where your fabric will be and lay your fabric on top of the mod podge. Rub out any bubbles or creases.

Take your sponge brush and do a coat of mod podge on the top of the entire plate.


After it dries. Modge Podge the portion where your letter will be going and stick your letter on it. Let that dry.


Now do a few thin coats of Mod Podge over the entire project. Let it dry between each coat.

Wala! All done! Now just put it out on your table or wherever to display your neat handy work!


Monday, July 9, 2012

Key Hanger

Who loves Mod Podge!? I do! I do!

The possibilities are endless with this stuff! I absolutely love it! I very well may be an addict! hahaha


This was a project that I done for our Preacher and his wife. They are Bama fans just like us (can't ya tell!). I had a few ideas for them but I let my hubby pick which one he wanted me to do and he picked the Key Holder.

You will Need:
* Piece of wood OR plaque
* scrapbook paper
* Sponge Brush
* Wooden or cardboard letters
* Your choice of paint color
* Ribbon
* Sharp box cutter or scrapbook cutter
* Cup Hooks for hanging the keys - I got a pk. of six that were 1"
* Mod Podge ***OF COURSE*** Yay!


Okie Dokie... Lets start our fun little project! Shall we?

First, paint the edges of your plaque. Let it dry.

Apply your Mod Podge on top of your plaque and place your scrapbook paper on top of it. Smooth out any bubbles that pop up.
Don't worry if you can't get them all. They will go away once it dries completely.

Cut around your scrapbook paper, leaving only the glue section. (I forgot to take a picture of this step, Whoopsie!

Paint the letters. After they have dried, using your Mod Podge, glue them in place on your plaque. Mod Podge over your entire plaque. I have found that a few thin coats does a lot better than one thick coat. Be sure to let it dry between coats.


Once the front has dried, cut your ribbon to your preferred size, heat seal the ends and hot glue one end of each to the back.


Measuring the bottom of your plaque, evenly measure and mark where your hooks should go and screw them in.

Hang and Enjoy!

That's it! Really easy huh?