Wednesday, December 26, 2012

How To Make Peppermint Bark

I LOVE Peppermint Bark and it's so easy to make yourself! You can make a lot more yourself than you can buy it too. Saving money.... umm... YES PLEASE!


You Will Need:
* White Chocolate
* Milk OR dark chocolate (whichever you prefer)
* Peppermint candy ( I used candy canes)
*Wax Paper
*Cookie Sheet Pan

Melt your chocolate either in a microwave safe bowl OR in a double boiler pot.
I don't have a specific amount. I just eyeballed it to what I thought I would want.

 POur your melted chocolate onto you wax paper lined cookie sheet pan and spread it to the thickness you want. It's usually about 1/4".
Sit it in the fridge for about 20 minutes.


Double bag your peppermints or candy canes in a Ziploc. Crush them with a rolling pin to the size you like.
 Separate your larger chunks from the peppermint "dust".

 Melt you white chocolate and mix in some of your peppermint "dust". 

Remove your hardened chocolate from the fridge and pour your white chocolate on top of it. Spread it around until the chocolate underneath is covered. This is also usually around 1/4" or so thick.

Sprinkle your larger peppermint chunks on top and sit it in the fridge for another 20 minutes.

After it's hardened, break it up into pieces and wala... you're done!


Saw Tooth Star Memory Quilt

Ok... I've been keeping one secret the last few months. For a good reason though! I had my wonderful sister-in-law help me find pictures for my Mother-in-law's Memory Quilt for Christmas, but she had no idea I was making a photo memory quilt for her too!
My husband and my mom are the only ones who knew about both of the quilts. I wanted to show it when I was finished but I couldn't risk her seeing it before Christmas. 

I finally got to give it to her! FINALLY! It was hard not telling her when I basically tell her everything!

Here is Susan's Saw Tooth Start Memory Quilt!


What do you think??? It's not perfect but it is my first star quilt and only my 2nd quilt ever, so I'm happy with how it turned out!

I got the star measurements from Thought and Found. She has great measurements on the stars and explains how to do them very well! I used 4x6 photos (except 2 that were smaller) for the star centers. To make them the size I wanted, I just added the extra fabric around the sides that were 4". 


Tuesday, December 18, 2012

The Granny Quilt


This is the Granny Quilt pattern I made. (((Pattern Coming Soon))) It is a Christmas gift for my mother-in-law. It is also my very fist quilt! I've done small table runners but nothing this big.

I used 10 Sewable Printable Fabric Sheets for this Quilt. They are really easy to work with if you ever decide to try them.

I machine quilted it using my regular sewing machine and it was actually pretty easy. I'll have a post up soon on Free Motion Quilting with a home sewing machine. I done simple stippling quilting and I just love it! I love the cozy wrinkly feel of quilts... they are just so comfy!

(A big thank you to my hubby for helping with pictures! Love his heart... he really does try!)

Here are a few more pictures!


Wednesday, December 12, 2012

Photo Quilt Peek

I've been working on the quilting for my MIL's quilt for Christmas and I wanted to give you a small peak of what type of quilt stitching I'm doing. It's not finished yet but when it gets done, I will post photos of the full quilt along with the pattern I made up for it.


This quilt stitching is stippling. It's very easy once you get going. It's sort of like you're dancing all over your quilt.

The entire quilt except the pictures and the center will be done like this. The center will have hearts centered around my in-law's wedding picture.

I'll post full quilt pics soon! I hope you all are ready for Christmas... it's right around the corner!

Friday, December 7, 2012

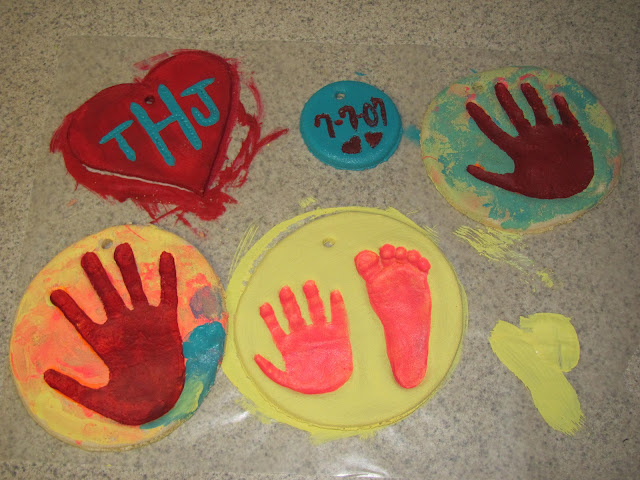
Salt Dough Christmas Ornaments

The other day I had a friend make some of these for her kids and I thought it was so cute! Of course I had to share how to do them! 

 You Will Need:
* 1 cup of flour
* 1 cup of salt
* 1/2 cup of water
 
 Here are some that we made!
My Sweet Ella's Ornament!
Yeah, that's yellow and pink but the picture looks orange. hmmm

My sweet Brenna's ornament!

My sweet Emma's ornament!


So, these cute little ornaments are really easy to do! Just knead the ingredients listed above in a bowl until it's about the consistency of play dough.


 Roll out your dough on a piece of wax paper. Make the dough around 1/4" thick.
Make your designs. Cookie cutters would come in really handy! Wouldn't you know I couldn't find any, so I used bowls to make a circle outline for ours.


Place your cut outs on a baking sheet lined with wax paper. 
Take a straw and make holes for the ribbon to be tied through.

Bake at 200° for about 2 hours or until hard.
The smallest one we made was done in about an hour but the larger ones took about two hours.

After they are all done and cooled off... Time for the fun part, PAINT!
I let the girls paint them however they wanted, let them dry, then went over their hand print with red paint so they could be seen.

Those other two are mine. Not the best but it was fun! I need to invest in some paint pens for projects like this!

My girls HAD to have glitter, so I had some of this spray glitter in my craft stash. 
After the paint dried, we sprayed the ornaments with glitter twice and then sealed them using the Mod Podge clear acrylic sealer.

Just for fun, here are the ones I done. Next time, I'm getting cookie cutters and paint pens! Hehe

Just in case you're wondering... yep, that special date is the day we were married!

Happy Memory Making!

Thursday, November 8, 2012

Spider Cupcakes

I wanted to make some Spider Cupcakes but I wanted them to look fun for the kiddos.
What do you think???

You Will Need:
*Cupcake Cups
* Chocolate Cake Mix
*Chocolate Icing
* M&Ms
*Twizzlers
* Small Marshmallows
* Chocolate Sprinkles

Make your Chocolate Cupcakes as directed on the box, allow to cool, then ice then with your Chocolate Icing. (Save about a tablespoon or so to use as glue)

Sprinkle the Chocolate Sprinkles on them.

Cut your Marshmallows in half and set them as the whites of the eyes.
Using your Icing on you saved, dot the back of your M&Ms for the eyes and attach them to the Marshmallows.
Attach your M&M nose.

Cut you Twizzlers to size and use the Twizzler strings as legs, attaching 3 - 4 on each side.

Now those are my kinda of spiders! Chocolate ones! Hehe!


Worms and Dirt Treat

This was a big hit at the party! They are REALLY good!

You Will Need:
* Small or Medium size cups
* Oreos
*Cool Whip
*Chocolate Syrup
*Gummy Worms
Squirt some Chocolate Syrup in your Cool Whip and mix ( do this to taste). Put your chocolate Cool Whip in your cups.

Crush your Oreos and sprinkle them on top of the Cool Whip.
Add a little Chocolate Syrup on the Oreos and then top with Gummy Worms.

It's really easy and sooo good!

Halloween Chex Mix

Ok.. so I'm really glad I made the Halloween Chex Mix for our party! 
Why you ask??? 

It was the only thing our 2 year old nephew would eat! Haha! He LOVED the "worms" in it!


You Will Need:
* 1 Large Bowl
*1 Box of Rice Chex
* 1 large bag of M&Ms
* 1 Bag of small Marshmallows
* 1 Bag of Gummy Worms
* 1 Jar of Peanuts
You could also throw in some Candy corn to make it a little more festive, but I personally don't like candy corn.

Mix everything in a large bowl and wala... a fun Halloween Chex Mix!

This makes A LOT of mix!


Mummy Dogs

Our Mummy Dogs were a hit at the party! They are super easy too!


You will Need:
* Hotdogs
* Large Crescent Rolls
* Mustard
Cook your hotdogs and allow them to cool after they are done. Preheat your oven to the temperature the crescent rolls suggest.  
Unroll your Crescent Rolls and take a pizza cutter and cut them into strips. (I just eye balled it)
Wrap your strips around the hotdog weenies one at a time, leaving a small gap near the top, so they "eyes" can show.
Bake you "mummies" until they are golden brown.
Allow to cool, then dot eyes on using mustard.
Your all done!
Now my brother-in-law actually had a clever idea! You could use the weenies with the cheese in them and poke holes with a toothpick where the eyes should be and the cheese would take place of the mustard dots. 
I don't know how well it would work but it sounds like a neat idea! I'll have to try that next time!

Bowl A Ghost

We had our Halloween party last weekend for the kiddos and it was a lot of fun!
Bowl A Ghost is a game that the kiddos played outside and they loved it! 
I have the "bowling pins" sitting on my outside mat b/c our yard is a little uneven and the "pins" sat much better on it.

They enjoyed helping make them too!


I got a small pumpkin (out of the grocery isle) without a stem and they used it as the ball.

All you do is paint 15 empty 2 liter bottles and paint them white. After they dry, use a permanent marker or paint to draw a ghost face on them.

Friday, October 26, 2012

Cure for Colt

This is Colt. He is 4 years old and a fighter to neuroblastoma, a form of cancer. Colt and his family go to our church. He is a handsome, sweet and strong little boy! He has been battling cancer on and off since he was 6 months old.  You may Donate to Colt & His Family Here --------------------------------------->>>


Colt has been in and out of the hospital so much! I talked with Colt's mom today and she said the chemo is not working this time, and his tumor doubled in size after the second round! As a mother, I couldn't even begin to imagine what his mom and family are going through!
Colt's family has stayed strong in their faith in the Lord throughout this whole journey, which I am so thankful for! Having a sick child could make some question faith at times, but they have held strong in knowing the Lord is with them each step of the way!

Colt and his wonderful mama, BreAnna!

Colt and his new baby brother riding in the wagon in the hospital.
I just think this is so sweet!

Super Colt!

I have set up a Donate button on Mama To Three Chicks to raise money for this family. The Donate Button is located on the top of the right side of the page, above the About Me section. EVERYTHING will go to them to help with food, lodging, gas, hospital bills, medicine or however the family sees fit. The family has a lot of expenses and any donation would be appreciated. You can donate as little or as much as you wish. Everything is done through Paypal, so it is secured. Most of all, if you can't donate, please pray for Colt!!!

A Pray for Colt Phillips page has been setup on facebook. You may leave comments and words of support there or here for Colt and the family. 

Tuesday, October 23, 2012

Our new blog design

So we finally have had our new blog design up for a few weeks. What do you think???  I just love it so much!

About 2 months ago I had a not so great thing going on with a blog designer and I was so frustrated. Long story short... I paid someone and they took my money but didn't do the design and never returned any of my messages. Can you say FRUSTRATED!  Thankfully PayPal returned my money! Sheewww!!!
Lucky me... I found Emily at Sweet Bella Roos and she was FANTASTIC! She listened to me so well and sent me samples so quick! She is awesome to work with! If you're in the need of a  blog design, give her a shout!


Tuesday, October 16, 2012

Fabric Shopping

So, I have already started on Christmas stuff this year. I have been doing a quilt for my mother in law and the top is finished and all ready for backing and quilting. Yay! Now, I'm starting on another project as well... it's a special little project and the hubby and I went to Hobby Lobby (he really must love me, hehehe)... anywhoo... I found some adorable fabric for this special project. 

Here it is!
Keep in mind that the recipient loves bright colors and so do I! These fabrics make me smile. I also have a nice yellow and white that will be paired up with these. I will be cutting them all up for quilting pieces soon... I'm so anxious to get started!

So what do you think of my fabric choices???

Saturday, October 13, 2012

Measurements within your "Inch"


Recently I was in the fabric store and I overheard a lady getting some fabric ask the worker exactly how much was 7/8.? 
So, I thought that this would be a nice little recap tutorial. I know that when I started sewing, I had to really brush up on my measurements! After a while, everything came back to me though.

Here are your measurements within your inch.
I hope it comes in handy. :)


Friday, October 12, 2012

How to make a Pumpkin Roll


Mmmm.... Pumpkin Roll! This is a Fall favorite at our house! For the past few years, every October I make everyone a Pumpkin Roll. It's funny... I'm not a fan of cooking (blah!), but I enjoy baking! Hmmm... maybe it's a sweet thing! 

You Will Need:
Wet Ingredient Mix:
* 3 eggs
* 1 cup of sugar
* 2/3 cup of Pumpkin (you can buy it in a can in the isle with pie filling)
*  1 teaspoon Lemon Juice

Dry ingredient mix:
* 3/4 cup All-purpose Flour
* 1 teaspoon Baking Powder
* 2 teaspoons Cinnamon
* 1 teaspoon Ginger
* 1/2 teaspoon Nutmeg
* 1/2 teaspoon Salt

Filling:
* 8 oz. Cream Cheese - softened
* 4 tablespoons Butter
* 1 cup Powdered Sugar
* 1/2 teaspoon Vanilla
Instructions:


In a large bowl, mix your eggs and sugar, beating with an electric mixer until blended well.

Add your Pumpkin and Lemon Juice, mix until blended. (forgot to take a picture after this step)


In a separate bowl, combine Flour, Baking Powder,  Spices and Salt. (This is your Dry Mix)
Add to egg mixture (Wet Mix). Mix well with mixer.


Line a lightly greased 10 x 15 inch Jelly Roll Pan with wax paper and spread batter evenly in pan.
(TIP: If you don't have a Jelly Roll pan, a regular 10 x 15" pan will do. A Jelly Roll Pan is just slightly deeper on one side making rolling easier. I couldn't find one, so I've always used my regular one.)

Bake at 350 for 15 minutes. Remover from oven and allow to cool for 15 minutes. 

Place cake on a clean tea towel (dish towel) sprinkled liberally with powdered sugar. (My 11 year old sister was helping and she got a tad carried away with the "sprinkling")
Allow to cool another 10 minutes. 
From 10" side, carefully roll cake up in towel. Set aside.


Now for the Filling!

While cake is cooling in towel, you can make the filling. 
Beat together your Cream Cheese and Butter. Add Powdered Sugar and Vanilla, blend with mixer until smooth.
Unroll your cake.


Evenly spread filling over cake. Roll cake up (without the towel). 
Wrap in plastic wrap. Chill at least 1 hour before eating. Keep in refrigerator.

Now you have some Fall Yummy Goodness! 

Enjoy!