Wednesday, December 26, 2012

How To Make Peppermint Bark

I LOVE Peppermint Bark and it's so easy to make yourself! You can make a lot more yourself than you can buy it too. Saving money.... umm... YES PLEASE!


You Will Need:
* White Chocolate
* Milk OR dark chocolate (whichever you prefer)
* Peppermint candy ( I used candy canes)
*Wax Paper
*Cookie Sheet Pan

Melt your chocolate either in a microwave safe bowl OR in a double boiler pot.
I don't have a specific amount. I just eyeballed it to what I thought I would want.

 POur your melted chocolate onto you wax paper lined cookie sheet pan and spread it to the thickness you want. It's usually about 1/4".
Sit it in the fridge for about 20 minutes.


Double bag your peppermints or candy canes in a Ziploc. Crush them with a rolling pin to the size you like.
 Separate your larger chunks from the peppermint "dust".

 Melt you white chocolate and mix in some of your peppermint "dust". 

Remove your hardened chocolate from the fridge and pour your white chocolate on top of it. Spread it around until the chocolate underneath is covered. This is also usually around 1/4" or so thick.

Sprinkle your larger peppermint chunks on top and sit it in the fridge for another 20 minutes.

After it's hardened, break it up into pieces and wala... you're done!


Saw Tooth Star Memory Quilt

Ok... I've been keeping one secret the last few months. For a good reason though! I had my wonderful sister-in-law help me find pictures for my Mother-in-law's Memory Quilt for Christmas, but she had no idea I was making a photo memory quilt for her too!
My husband and my mom are the only ones who knew about both of the quilts. I wanted to show it when I was finished but I couldn't risk her seeing it before Christmas. 

I finally got to give it to her! FINALLY! It was hard not telling her when I basically tell her everything!

Here is Susan's Saw Tooth Start Memory Quilt!


What do you think??? It's not perfect but it is my first star quilt and only my 2nd quilt ever, so I'm happy with how it turned out!

I got the star measurements from Thought and Found. She has great measurements on the stars and explains how to do them very well! I used 4x6 photos (except 2 that were smaller) for the star centers. To make them the size I wanted, I just added the extra fabric around the sides that were 4". 


Tuesday, December 18, 2012

The Granny Quilt


This is the Granny Quilt pattern I made. (((Pattern Coming Soon))) It is a Christmas gift for my mother-in-law. It is also my very fist quilt! I've done small table runners but nothing this big.

I used 10 Sewable Printable Fabric Sheets for this Quilt. They are really easy to work with if you ever decide to try them.

I machine quilted it using my regular sewing machine and it was actually pretty easy. I'll have a post up soon on Free Motion Quilting with a home sewing machine. I done simple stippling quilting and I just love it! I love the cozy wrinkly feel of quilts... they are just so comfy!

(A big thank you to my hubby for helping with pictures! Love his heart... he really does try!)

Here are a few more pictures!


Wednesday, December 12, 2012

Photo Quilt Peek

I've been working on the quilting for my MIL's quilt for Christmas and I wanted to give you a small peak of what type of quilt stitching I'm doing. It's not finished yet but when it gets done, I will post photos of the full quilt along with the pattern I made up for it.


This quilt stitching is stippling. It's very easy once you get going. It's sort of like you're dancing all over your quilt.

The entire quilt except the pictures and the center will be done like this. The center will have hearts centered around my in-law's wedding picture.

I'll post full quilt pics soon! I hope you all are ready for Christmas... it's right around the corner!

Friday, December 7, 2012

Salt Dough Christmas Ornaments

The other day I had a friend make some of these for her kids and I thought it was so cute! Of course I had to share how to do them! 

 You Will Need:
* 1 cup of flour
* 1 cup of salt
* 1/2 cup of water
 
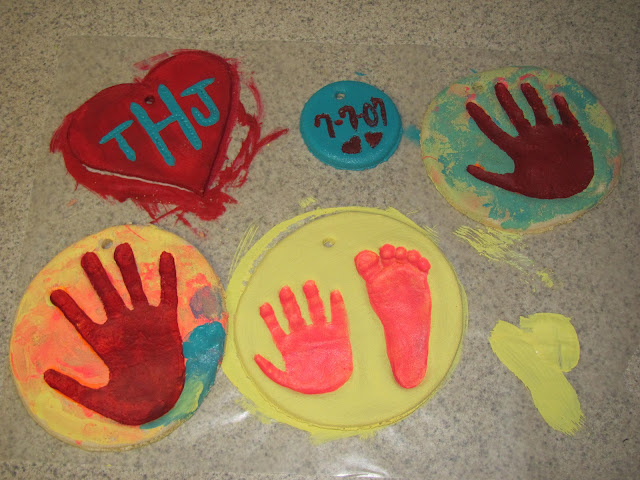
 Here are some that we made!
My Sweet Ella's Ornament!
Yeah, that's yellow and pink but the picture looks orange. hmmm

My sweet Brenna's ornament!

My sweet Emma's ornament!


So, these cute little ornaments are really easy to do! Just knead the ingredients listed above in a bowl until it's about the consistency of play dough.


 Roll out your dough on a piece of wax paper. Make the dough around 1/4" thick.
Make your designs. Cookie cutters would come in really handy! Wouldn't you know I couldn't find any, so I used bowls to make a circle outline for ours.


Place your cut outs on a baking sheet lined with wax paper. 
Take a straw and make holes for the ribbon to be tied through.

Bake at 200° for about 2 hours or until hard.
The smallest one we made was done in about an hour but the larger ones took about two hours.

After they are all done and cooled off... Time for the fun part, PAINT!
I let the girls paint them however they wanted, let them dry, then went over their hand print with red paint so they could be seen.

Those other two are mine. Not the best but it was fun! I need to invest in some paint pens for projects like this!

My girls HAD to have glitter, so I had some of this spray glitter in my craft stash. 
After the paint dried, we sprayed the ornaments with glitter twice and then sealed them using the Mod Podge clear acrylic sealer.

Just for fun, here are the ones I done. Next time, I'm getting cookie cutters and paint pens! Hehe

Just in case you're wondering... yep, that special date is the day we were married!

Happy Memory Making!